Shocker MINDSTORMS Challenge
Towers of Doom
Apprentice Mission created by Andy and Susan Helten
(Beginner and Beginner II Teams)
Story:
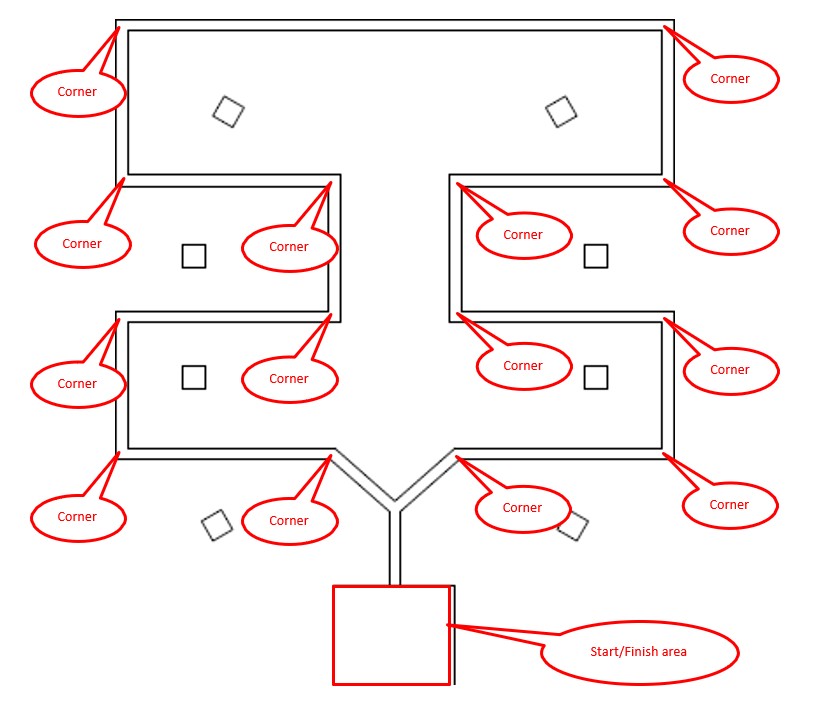
Ye be seeking the pirate treasure aye? Your pirate bot must traverse the dark cave searching for the hidden treasure. Find it (green block), and make it home safely. Be careful not to touch the cursed treasure (red block) or you will be forever haunted by the evil spirit of Davey Jones.
BEWARE the TOWERS OF DOOM!
Bill of Materials:
|
Material |
Quantity |
Availability |
Estimated |
Estimated |
|
3M Scotch White Electrical Tape ¾” x 66' |
1 |
Home Depot |
$3.98 |
$3.98 |
|
Rust-Oleum Painter's Touch 2X Flat Black Paint |
1 |
Home Depot |
$3.87 |
$3.87 |
|
Rust-Oleum Painter's Touch 2X Gloss Apple Red |
1 |
Home Depot |
$3.87 |
$3.87 |
|
SPAX #6 x ½” Construction Screws |
1 |
Home Depot |
$1.94 |
$1.94 |
|
SPAX #6 x 1¼” Construction Screws |
1 |
Home Depot |
$1.94 |
$1.94 |
|
SPAX #8 x 2½” Construction Screws |
1 |
Home Depot |
$1.94 |
$1.94 |
|
1” x 2” x 8' Furring Strip Board |
3 |
Home Depot |
$0.92 |
$2.76 |
|
2” x 2” x 8' Strip Board (for eight 8” towers) |
1 |
Home Depot |
$1.57 |
$1.57 |
|
¼” 4' x 8' Plywood Sheet |
1 |
Home Depot |
$19.92 |
$19.92 |
|
|
|
|
|
$41.79 |
Scoring Matrix:
|
Task |
Points |
Cumulative |
|
Robot begins inside Starting Area marked by red box |
|
|
|
Robot earns points the first time (only) that any part of robot passes over: |
|
|
|
First (1st) corner AFTER split (Y) in path |
5 |
5 |
|
Second (2nd) corner |
10 |
15 |
|
Third (3rd) corner |
15 |
30 |
|
Fourth (4th) corner |
20 |
50 |
|
Fifth (5th) corner |
25 |
75 |
|
Sixth (6th) corner |
30 |
105 |
|
Seventh (7th) corner |
35 |
140 |
|
Top of ramp platform |
100 |
240 |
|
Eighth (8th) corner |
40 |
280 |
|
Ninth (9th) corner |
45 |
325 |
|
Tenth (10th) corner |
50 |
375 |
|
Eleventh (11th) corner |
55 |
430 |
|
Twelfth (12th) corner |
60 |
490 |
|
Thirteenth (13th) corner |
65 |
555 |
|
Fourteenth (14th) corner |
70 |
625 |
|
Robot returns to start area (any part of robot touches start area) |
75 |
700 |
|
Robot knocks off green block from tower (this can happen at any time during run) |
200 |
900 |
|
Robot knocks off red block from tower (this can happen at any time during run) |
-200 |
|
|
The following bonus for timing can only be earned if the robot follows the serpentine line, touching all corners in sequence, and returns to the starting point. |
|
|
|
Robot touches all 14 corners and top of ramp in less than 60 seconds |
100 |
1000 |
|
Points Possible |
|
1000 |
Course Photos (jpg):
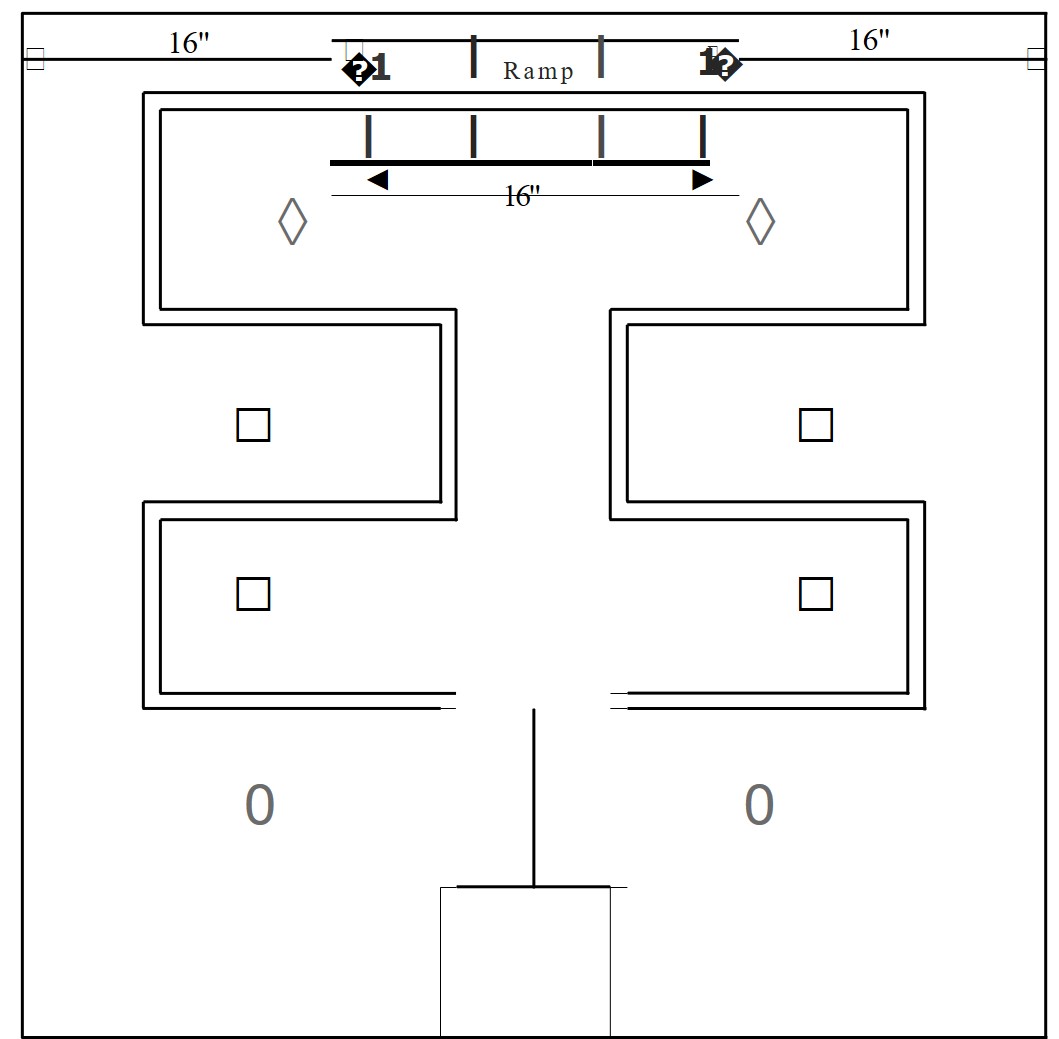
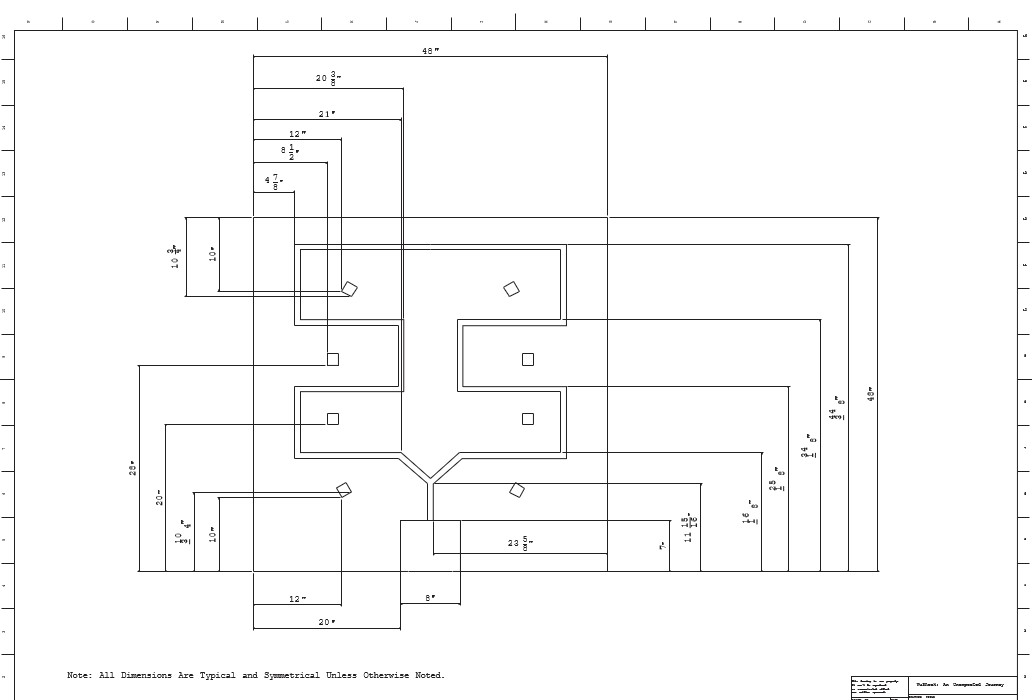
Building Instructions for "Towers Of Doom":
1.Measure and cut 4’ x 8’ sheet of plywood in half (or ask Home Depot to do it!). You will use one 4’ x 4’ sheet for the course base.
2.Attach a support frame to the underside of the course base. Cut down TWO of the 1”x 2” x 8’ Furring Strip boards to build a frame to support the bottom base of the course. Each strip should be approximately 4’ to fit along the edge of the underside of base. Attach the 4’ x 4’ plywood to the frame using four 1¼” screws around each edge of the 4’ x 4’ plywood. The frame boards were also attached to one another at the corners using a single 1¼” screw. For extra support, add a board down the middle of the course base (this board was only screwed to the frame, not to the 4’ x 4’ plywood).
3.Spray paint top side of 4’ x 4’ course base with Flat Black paint.
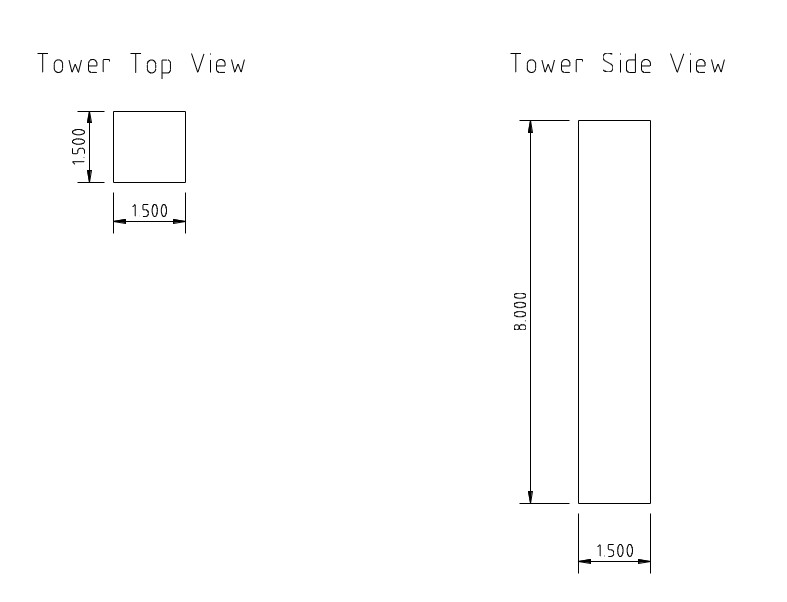
4.Cut 2” x 2” x 8’ strip board into EIGHT 8” towers. Spray paint each tower with Flat Black paint.
5.Using dimensions given in main course drawing, mark off the 8” x 7” red box with painters tape and scrap paper to prevent overspray. Paint box with Gloss Apple Red paint – two or more coats may be necessary.
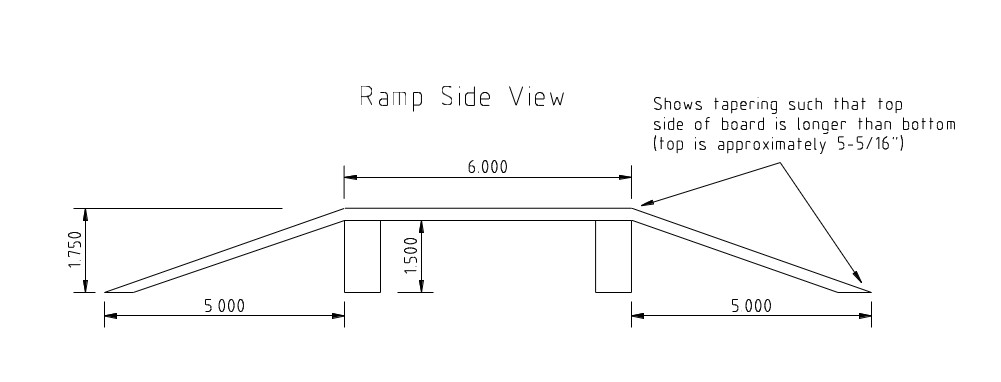
6.Next build the ramp using part of the remaining 4’ x 4’ plywood sheet (other scrap wood can be used for the ramp as long as the surface is similar to the plywood):
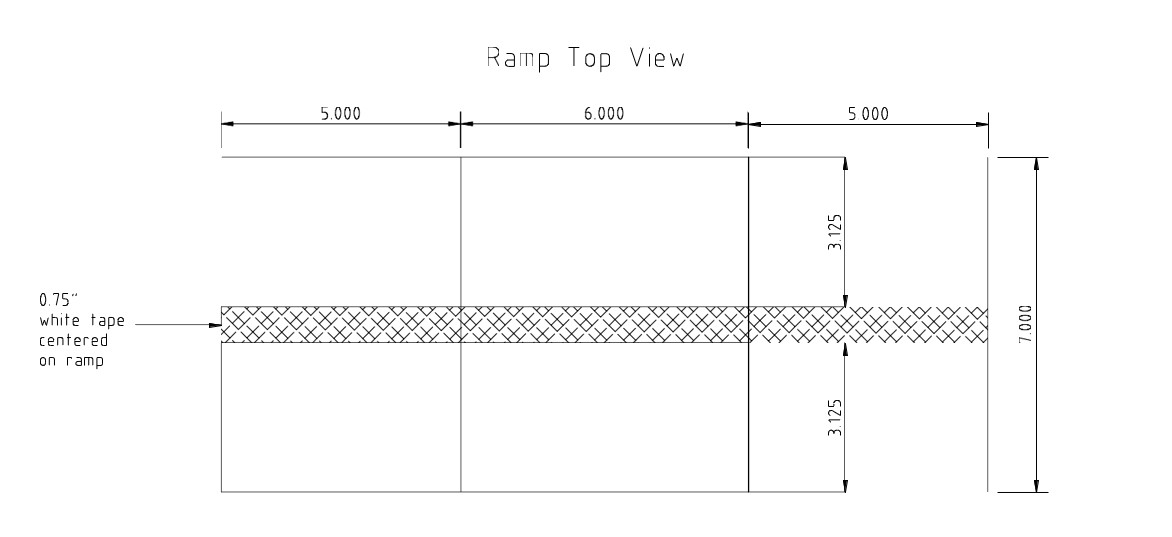
a.Cut the ramp’s top platform first making it 6” long and 7” wide.
b.Cut the incline surfaces of the ramp. The horizontal span of the incline boards is 5” but the board itself must be cut longer, for example, 5.5” long and 7” wide. As indicated on the ramp
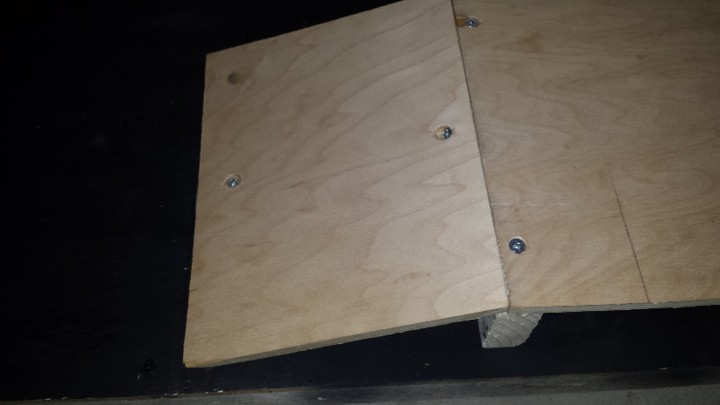
drawing, the top and bottom edges of the incline were tapered such that the top side of incline is longer than the bottom to make for a smooth transition. The tapers were made by first cutting the bottom edge of the ramp incline at a 45 degree angle with a table saw (45 degrees was the largest angle our table saw could cut but a sharper angle would be better). The angle on that edge was then sanded with a belt sander to make the angle sharper. Trial and error was used to achieve the correct angle (see Figure 1). Just be sure not to sand the leading edge of the ramp incline or the top of the board becomes shorter! Once this angle was complete, the incline board was cut with a table saw to approximately 5-5/16” at a 15 degree angle (but still 7” wide!).
c.Cut ramp supports and attach ramp top platform. Using 1” x 2” x 8’ Furring strip boards, make
two 7” long and 1½” tall supports for the ramp. Attach the ramp’s 6” x 7” top platform to these supports using ½" screws. The screws were pre-drilled and countersunk to slightly below the surface of the ramp platform (see Figure 2). This is not shown in the drawings but, in the actual build, the two 7” furring strip supports were positioned to protrude about 1/8” from the edge of the top platform – this was to provide support for the ramp inclines (see Figure 2 and Figure 3).
d.Attach the ramp base to the course base using 1¼” screws, screwed in from the bottom of the course base. The ramp base is centered on the “back line” of the course, which puts the top
platform at exactly 21” from each edge of the course base (see Figure 4). The ramp was then centered on the “back line” by first marking the back line on the course base and then putting a mark on the supports on both sides of the ramp base at 3-1/8” from the outside edge of the ramp supports (see Figure 5).
e.The ramp inclines were attached with glue on both the top and bottom of the ramp incline. A ¼” screw was used on the bottom of the ramp and a 1-1/4” screw was used on the top (screwed into the ramp supports). These screws were centered on the ramp and countersunk so that the screws will be covered by the ¾” tapeline (see Figure 6).
7.After attaching the ramp, spray it Flat Black being careful not to overspray the red block painted in Step 5.
8.After paint all black paint is dry, make measurements and marks for the tape line. Then apply the ¾” white electrical tape to the pre-marked pathway.
TIP: Do not immediately apply stretched tape to the course base as it will shrink and pull off the course base! Instead, allow the tape to shrink back to its natural length for a few seconds, prior to
applying it to the course base.
9.Finally, measure and mark the position of the 8 towers using the measurements from the main course drawing. Note that the towers on the right side of the course match measurements for those on the
left side including the position of the bottom-left tower. The towers are attached to the course base with a dab of glue and one 2½” screw.
TIP: Drill a pilot hole through the top of the course base at the center of each tower location so that
positioning the screw from the bottom side is not a guessing game! A small flat washer was used in the official course build but this is optional.
Towes of Doom Closeup Images:
Figure 1 Tapered Bottom Edge of Ramp Incline
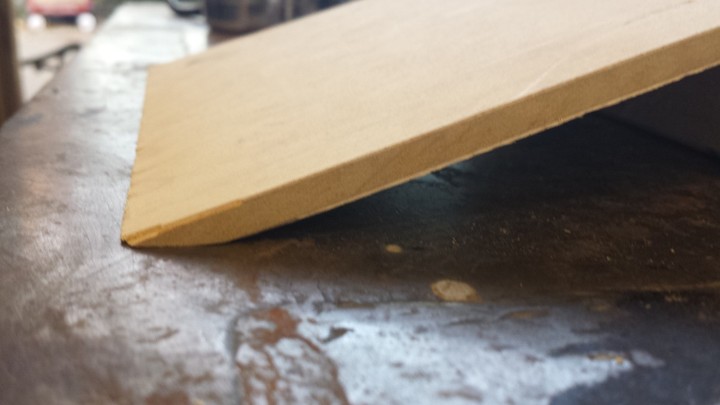
Figure 2 Countersunk Screws and Ramp Supports Protruding from Ramp Top Platform
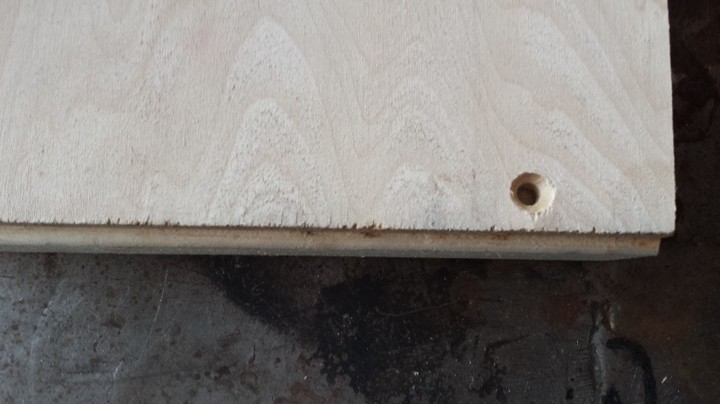
Figure 3 Top Platform Protruding to Support Incline Platform
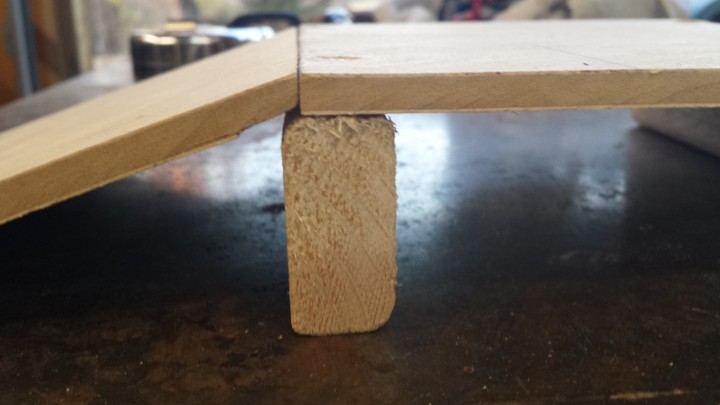
Figure 4 Center Ramp Base on Course Base
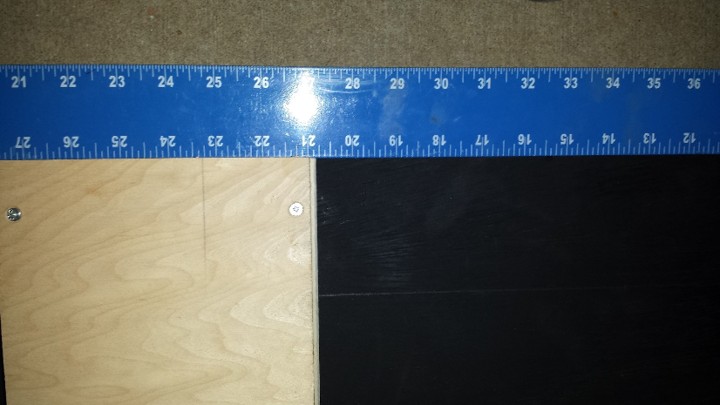
Figure 5 Center Ramp Base on "Back Line"
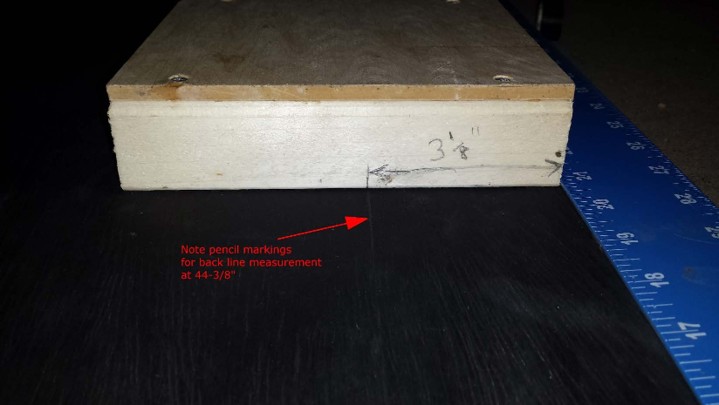
Figure 6 Ramp Incline Countersunk Screws Centered on Board