Welcome to the Shocker Central Employer Toolkit. This guide walks employers through the key features of Shocker Central, powered by 12twenty, including creating an account, posting jobs, and registering for career fairs. Best of all, creating an account and posting opportunities is completely free.
Table of Contents
Sign Up + Login

Navigate to https://wichita.12twenty.com/hire.
If you have previously used 12twenty with another college or university, use your existing email address and password. If needed, use the password reset option to receive instructions through the email associated with your account.
If you have never used 12twenty, click the Sign up for an account button and complete the account creation form.
- When typing your organization name in the Employer field, suggestions may appear. If your company already exists in the system, select it from the options. Otherwise, enter your organization's name.
- After completing the required fields on the form, check the box agreeing to the terms of service and click Create Account.
- A verification code will be sent to the email address provided. Your verification code is valid for one hour. If you do not see the email after 10 minutes, check your spam folder.
- Enter the verification code in the email verification pop-up to finalize the account creation process.
User Profile Setup + Updates
Keeping account information updated is easy and important for continued success in the 12twenty platform.
Once logged in, click your name in the bottom left-hand corner of the screen and select Account Settings.
The General settings include your contact information and profile photo. The Security settings include your password. The Integrations settings allow you to add a virtual meeting room.
Post a Job
From the homepage, click the Post a Job button, or navigate to Internships, Jobs and OCI in the left-hand navigation and click Post a Job in the top right corner.

Step 1: Complete the Job Posting
Complete all required fields on the job posting form.
Step 2: Choose an Application Method
Select how candidates should apply for your opportunity:
- Apply via This Site: Candidates submit their application materials through Shocker Central. You can review applications, download application packets, and manage candidates directly in the platform.
- Apply via External Link: Candidates are directed to an external website to apply.
- Apply via Email: Candidates send their application materials directly to the email address you provide.

Step 3: Select Required Documents
Choose which application materials you want candidates to submit by selecting the appropriate checkboxes. To remove a required document, click the X next to the document name.

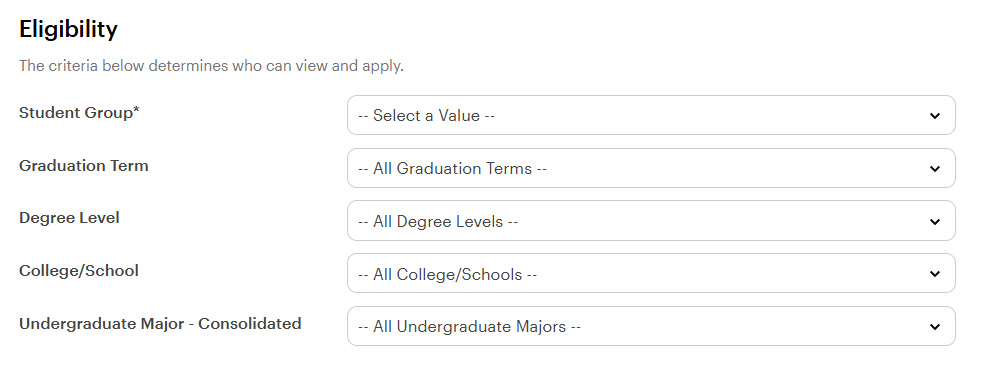
Step 4: Set Eligibility Requirements
Use the Eligibility section to determine who can view your job posting.
Important: Eligibility filters limit who can see your posting. Only select filters that are required for the position. The more eligibility options you select, the more exclusive your job posting will be.
The eligibility fields are designed to exclude certain viewers. Selecting too many options may prevent good candidates from being able to view the job description. For instance, if you check College of Fine Arts, then only students enrolled in a major in that college can view the position. Students in any other college will not be able to view or apply. However, eligibility filters can be useful when you need to narrow the candidate list. For example, if a graduate degree is required, selecting Graduate Degree means only students pursuing a master's or doctoral degree will be able to view the position.
For example:
- If you select College of Fine Arts, only students in that college will be able to view and apply for the position.
- Selecting Graduate Degree means only students pursuing a master's or doctoral degree can view the posting.
- The graduation term can be useful if you are looking to recruit applicants from a certain class. For example, if you are looking for freshmen, select graduation terms four years or more from the current semester. If you are looking for seniors, select the nearest spring, summer, and fall terms. If you are only looking for alumni, select the past graduation terms that apply.
Student Groups
The only criteria that should be selected for the student group are Current, ND-Current (non-degree), Alumni, and ND-Alumni (non-degree).
If your opportunity is available only to currently enrolled students (such as internships or student employment), do not select Alumni or ND-Alumni.
If you select Current, only students who are currently enrolled at Wichita State University in bachelor's or master's degree programs can view the job posting. If you select Alumni, only people who have already graduated from Wichita State University can view the posting. If you select an ND student group, it targets students who are in or have been in a Wichita State University certificate program.
If you are posting an internship, select Current and/or ND-Current. For a full-time role, you may select any or all of the four options above.
If you want to limit your job posting to only students in one college, select the applicable options in the College/School section. If you want your audience to be even more specific, you may select students from a particular major or academic program. Please be aware that doing this means students and alumni outside of your selected criteria will not be able to view the posting.
Tips for Success:
- Choose the Industry that best matches your organization or opportunity.
- Select Yes for CPT/OPT if your organization can hire international students.
- Leave the College and Major fields blank if your opportunity is open to students from all academic backgrounds. Selecting a college or major limits who can view your posting.
- The more information you include, the more likely your posting is to appear in students' job alerts and search results.
After You Submit
The Shocker Career Accelerator team will review your posting before approving it.
You'll receive an email once your posting has been approved.
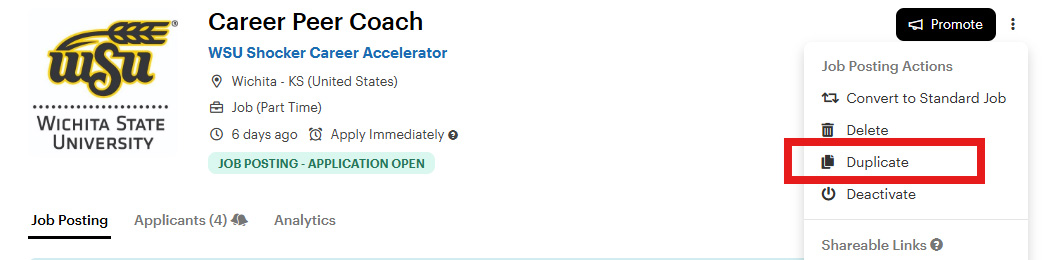
You can edit or extend your posting at any time. After it expires, you can quickly repost it by selecting Actions > Duplicate.
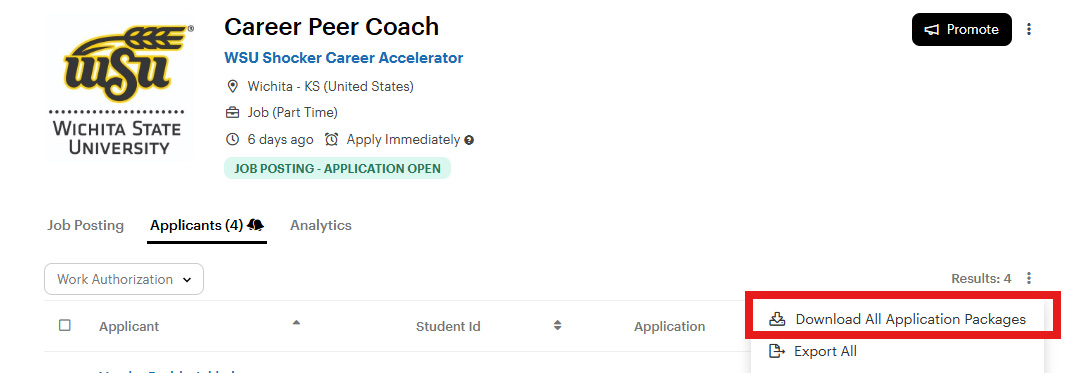
If you selected Apply via This Site, you can review candidate applications by opening the Applicants tab within your job posting. To download all application materials at once, select Download All Application Packages from the Actions menu.
Did you hire a Wichita State student? We'd love to celebrate their success! Email us at SCA@wichita.edu.
Attend a Career Fair
To register for a career fair, navigate to the Events page and select the fair you would like to attend. Review the event details and click Register in the top right corner.

Fill out the required information on the employer registration form, keeping in mind that students will be viewing employers in attendance through various filters, including optional and required fields on the form.
After submitting the form, your registration will show a Pending Approval status. You will be notified via email once your registration is approved.
12twenty for Employers
Looking to expand your candidate pool beyond a single career center? 12twenty for Employers offers premium subscriptions that enable employers to reach unlimited schools with a single job posting, interview, or event.
These subscriptions also provide access to advanced sourcing tools to help identify top talent more quickly.
To learn more, contact employersuccess@12twenty.com.
Need Assistance?
Our Employer Relations team is happy to help. Contact us at SCA@wichita.edu or (316) 978-3688 if you have questions about using Shocker Central or recruiting Wichita State students.