Projecting Your Device in Gray Media Box Rooms
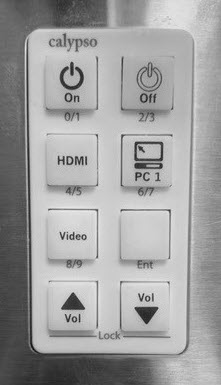
Step 1: Selecting Your Source in the Gray Media Box
Inside the media box, select the "ON" button to power up the projector suspended from the ceiling.
If you are connecting with an HDMI cord, select "HDMI".
In most instances, connecting and powering up your device will automatically project it to the screen.
All 'General Use' Gray Box rooms have a digital touch panel instead of the push-button system. This touch panel operates similarly to the push button panel. To turn the system on, select the power button located at the bottom right corner.

For more detailed instructions on using the digital touch panel, please review the Updated BYOD User Guide webpage.
Step 2: Projecting with PC-based Devices
In the event that your device does not automatically begin to project, or is not projecting the image you want, a simple keyboard command of Windows Key + letter "P", on a PC-based device, will open a sidebar menu that provides four projection options.
Projection options will appear for: "PC Screen Only", "Duplicate", "Extend", and "Second Screen Only".
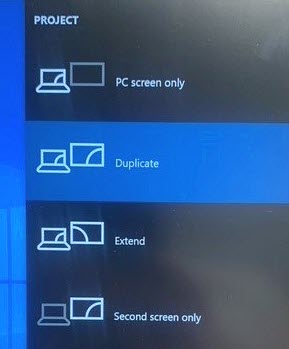
In most instances, the "Duplicate" option will work best.
If your laptop device is still not projecting, other settings may be need to be changed. Please call the CMS help desk at 978-3588 for assistance if needed.
Step 3: Projecting with Apple-based Devices
In the event that your device does not automatically begin to project, or is not projecting the image you want, follow these instructions for projecting with Apple-based devices:
Select the Apple icon in the top left of the screen, and select System Preferences.
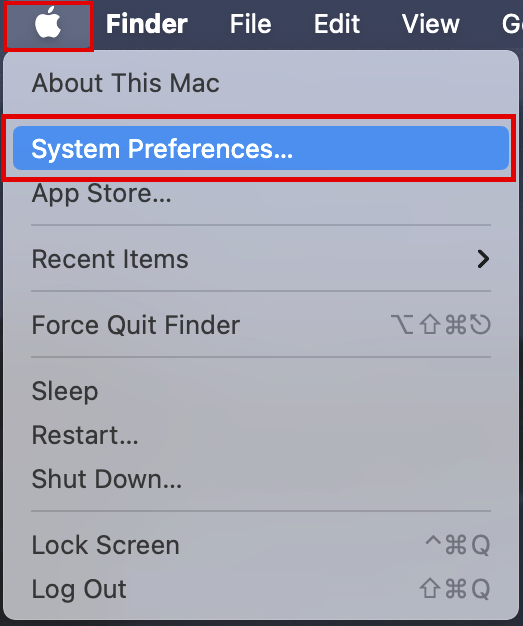
Then select Display.
Finally, checkmark the option for “duplicate image”.
If your laptop device is still not projecting, other settings may be need to be changed. Please call the CMS help desk at 978-3588 for assistance if needed.
Step 4: Optimizing Your Image Quality
Some newer laptops have extraordinarily high resolution, above the “native resolution” of the classroom’s data projector. While in most instances, laptops automatically adjust to match the projector’s native resolution and aspect ratio; not all devices will do this and the image will “blink” or not appear until the resolution has been lowered on your device.
To lower your device's resolution, locate the Display settings and lower the resolution as necessary. Typically, 1920x1080 will be sufficient.
You can also optimize the quality of the projected image by adjusting the lighting in the room. Most classrooms have “banks” of light that can be reduced as required with switches near the doorways. The preference is to turn off or down any lights directly above or near the projection screen to avoid glare.
If you have problems during any of these steps, help is available. Call Campus Media Services at 978-3588 for immediate assistance or submit a ticket and a CMS team member will get back to you shortly. If a service technician is unable to help you resolve the error over the phone, one will arrive quickly on-site. Lastly, please note it is essential that you call for assistance while you are experiencing the problem so that we can best troubleshoot the error as it occurs.